A High Availability cluster you haven’t failed over is a cluster you hope works. This is the failover plan I wrote and ran for a two-node NVIDIA UFM HA cluster: the preparation, three tests of increasing severity, the rollback for each, and the checks afterwards. Every command is here, along with the captures from the run.
The cluster is designed to fail over automatically so that InfiniBand subnet management isn’t interrupted. It prioritises data integrity through DRBD replication and fabric safety through STONITH fencing. (For what goes wrong when a node is lost unexpectedly, see Troubleshooting NVIDIA UFM HA Single-Node Recovery.)
Before you start: both nodes reachable, cluster services running, DRBD healthy, IPMI/iDRAC access available for fencing, and the activity window approved.
What to expect
| Plane | Impact during failover |
|---|---|
| Control plane / management | Minor, temporary interruption to the UFM Web UI and API (about 1–2 minutes) while services move between nodes |
| Data plane / InfiniBand fabric | None. Traffic stayed stable throughout, because the standby Subnet Manager took over without a gap |
Figures from the test report: service failover time of 60 seconds, and a two-hour maintenance window covering baseline checks, failover, failback and post-test verification.
The environment
| Node 1 (master) | 192.168.12.32, hopper-ufm-01 |
| Node 2 (standby) | 192.168.12.14, hopper-ufm-02 |
| Messaging | Corosync (node heartbeats) |
| Resource manager | Pacemaker |
| Storage | DRBD resource ha_data, mirrored in real time |
| Virtual IP | 192.168.12.20 |
| Filesystem | OCF Heartbeat Filesystem, mounted on the DRBD device |
| Application | UFM Enterprise in a Docker container |
| Fencing | fence_ipmilan (standard IPMI), method onoff (a full power cycle, for safety) |
Warning about STONITH. When you test it, the surviving node sends an IPMI/iDRAC command to forcibly reboot the node it believes has failed. That is a hard power-cycle by design. Only run it inside an approved window.
1. Preparation: the command centre
Before any failover, open three terminals so you can watch the cluster in real time.
Terminal 1 — on node 01 (the current master): cluster and DRBD status, refreshed every second.
watch -n 1 sudo ufm_ha_cluster status
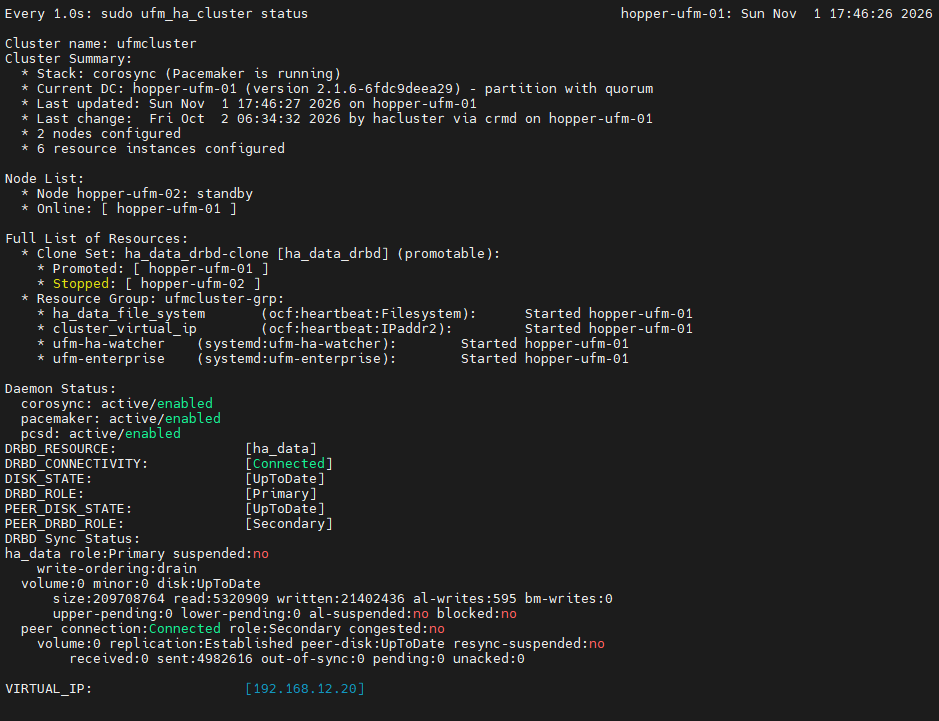
Baseline: all resources started on hopper-ufm-01, DRBD Connected, UpToDate on both sides, virtual IP 192.168.12.20.
Terminal 2 — on your own machine: watch the virtual IP move. On Windows use -t for a continuous ping; on Linux a plain ping already runs continuously.
ping 192.168.12.20 -t
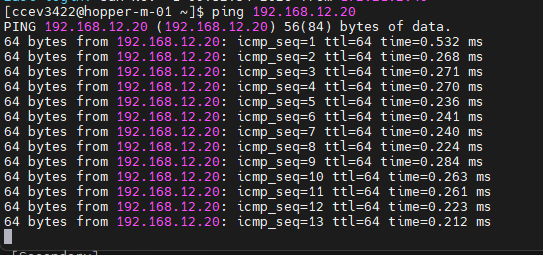
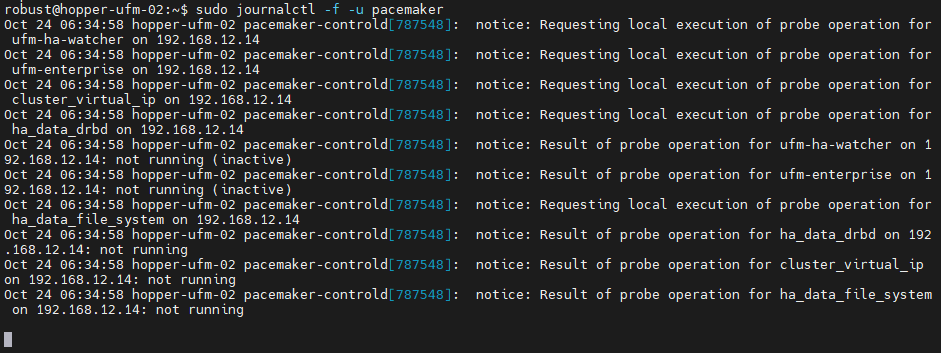
Terminal 3 — on node 02 (the standby): follow the Pacemaker log to see fencing and resource actions.
sudo journalctl -f -u pacemaker
2. Test 1: graceful “soft” failover
This checks that Pacemaker can cleanly unmount the disk, move the IP and start the service when an administrator asks it to.
Command, on the current master (hopper-ufm-01):
sudo pcs node standby 192.168.12.32
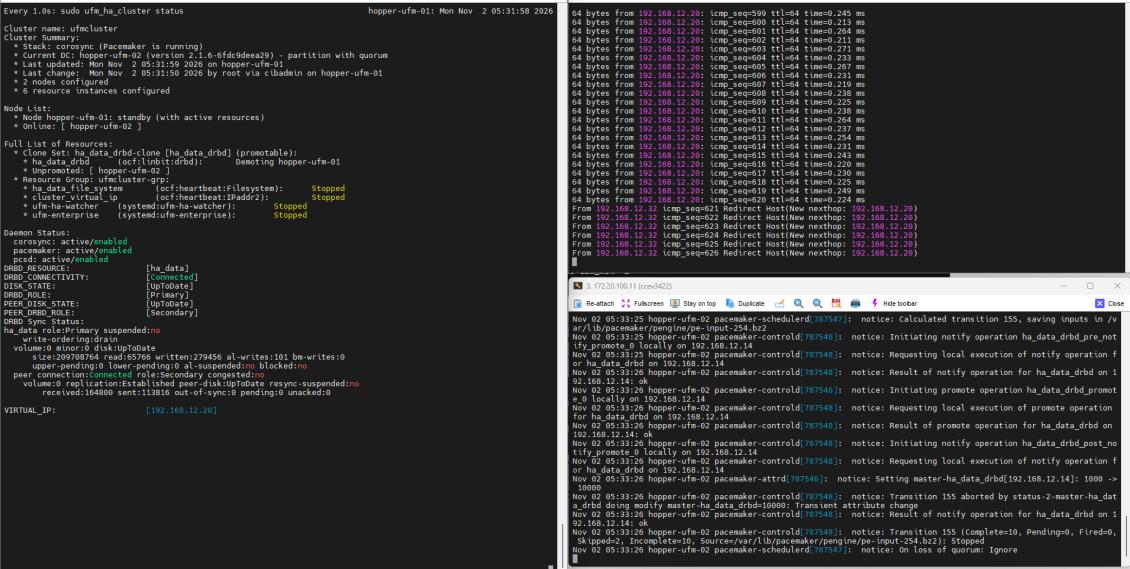
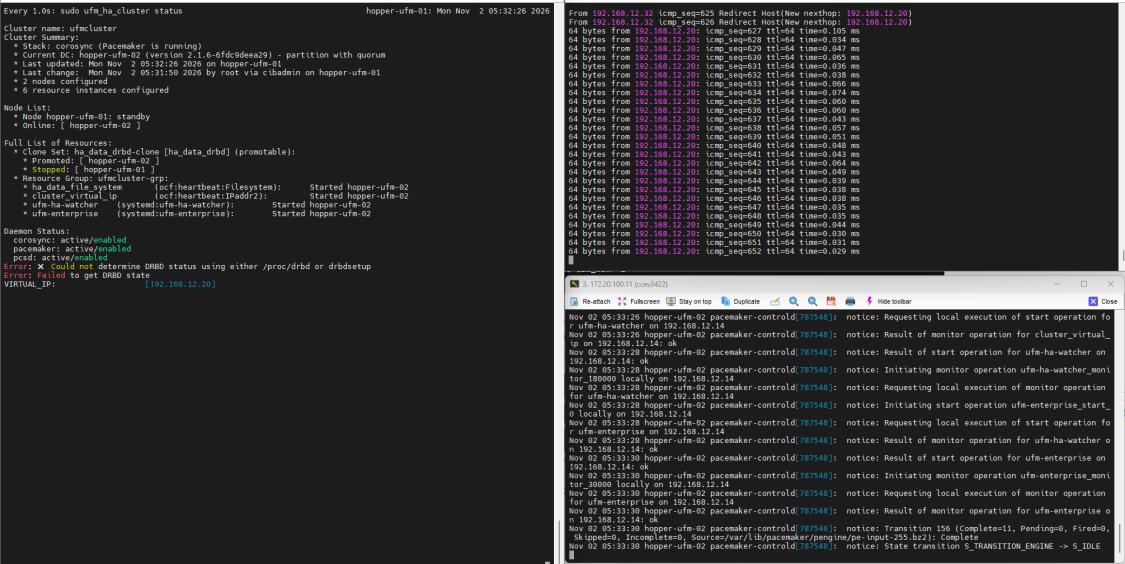
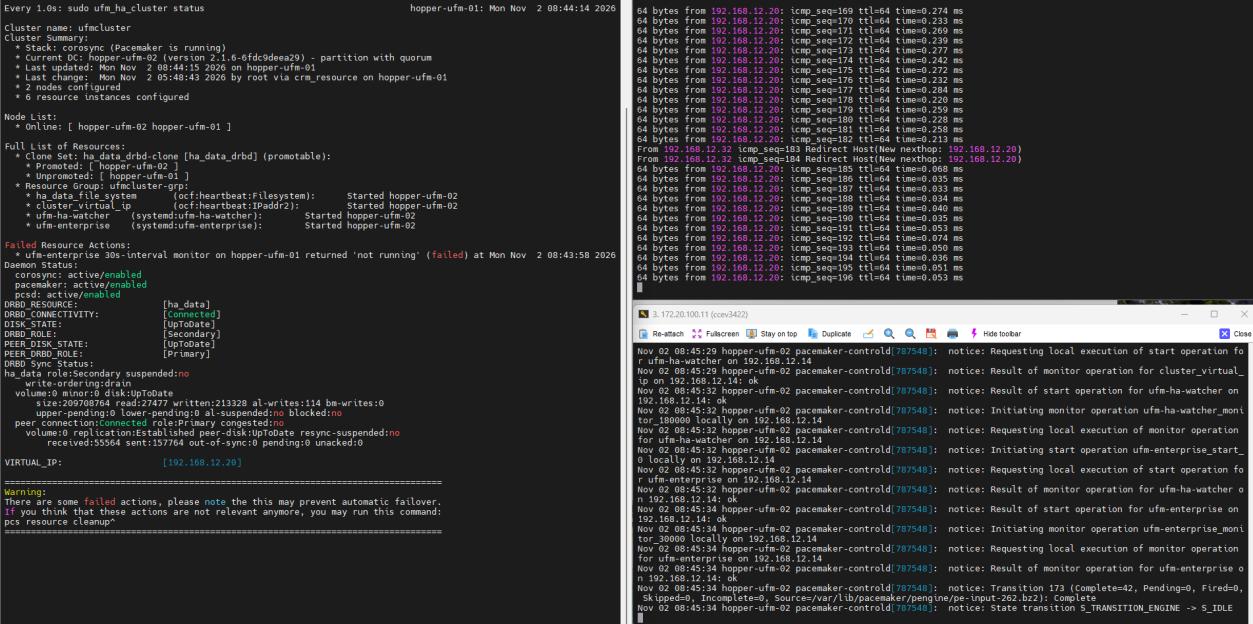
The left pane is Terminal 1, the right panes are the VIP ping and the Pacemaker log. In the ping output you can see ICMP “Redirect Host” lines while the address moves.
What to verify:
- The ping to the VIP drops for a few seconds, then resumes.
- Terminal 1 shows
hopper-ufm-01becoming Secondary andhopper-ufm-02becoming Primary. - The UFM web UI answers at
https://192.168.12.20.
Result:
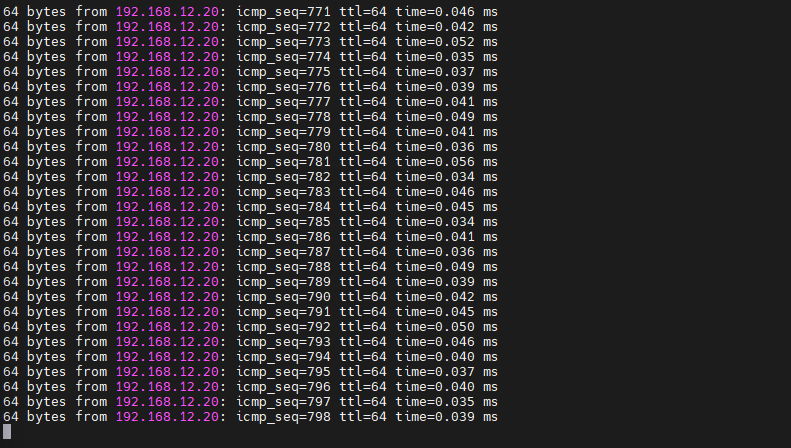
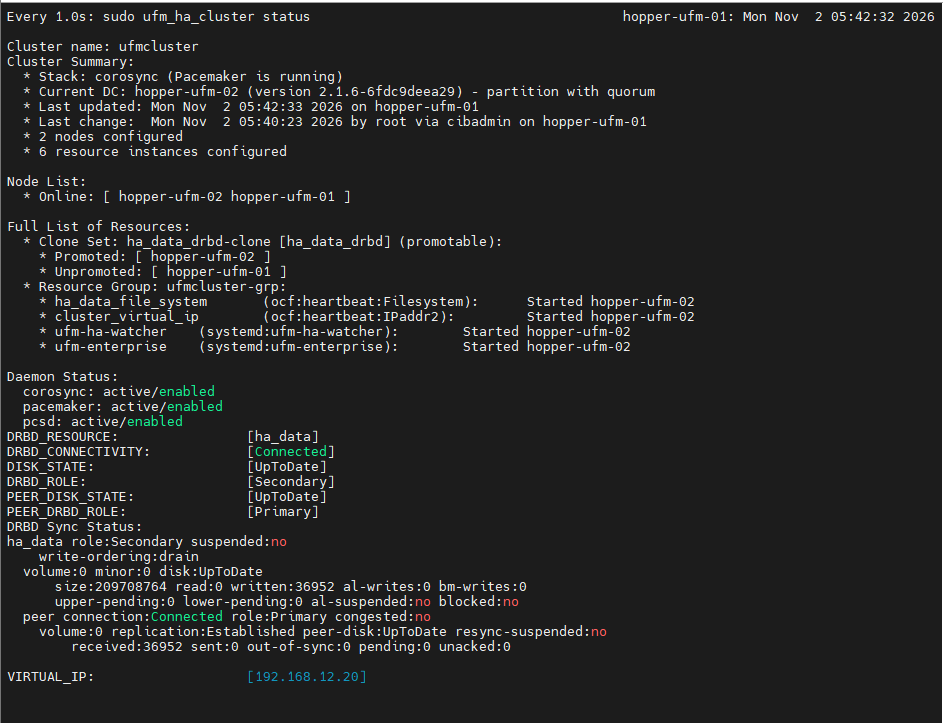
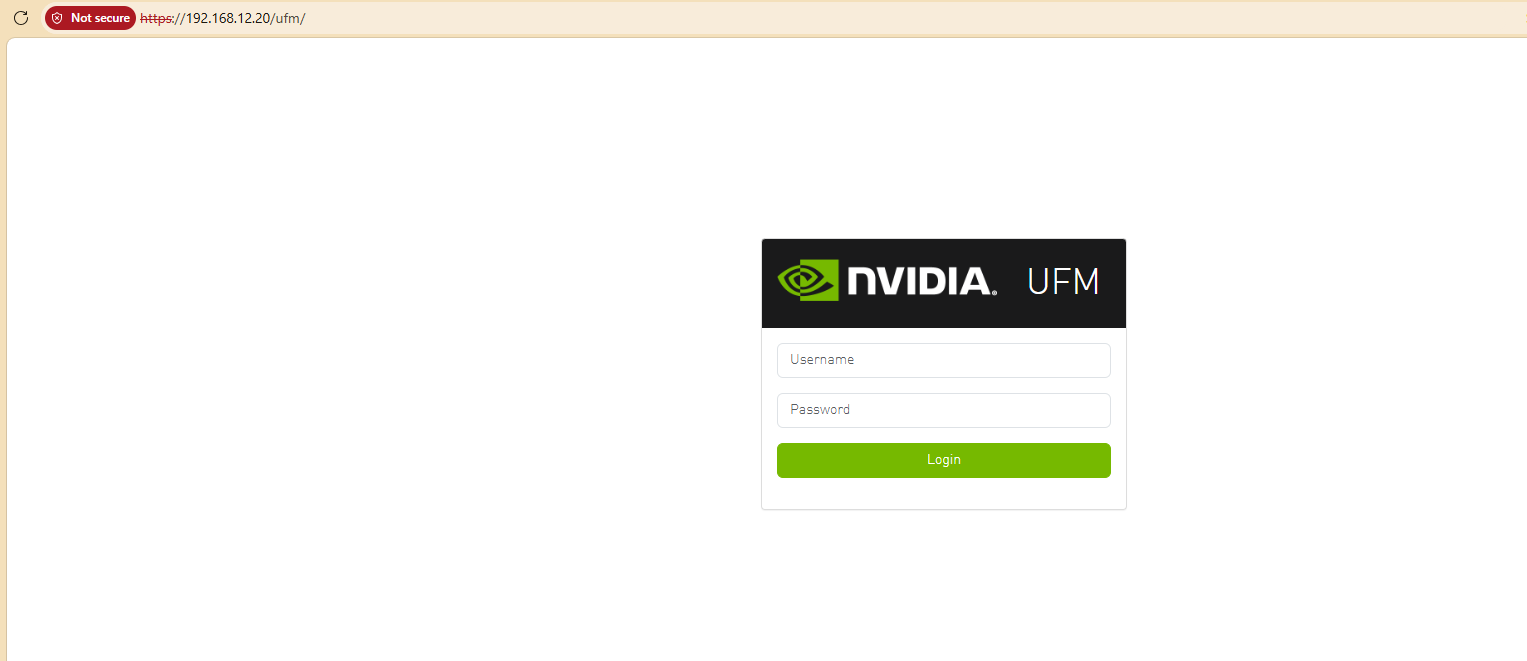
Rollback:
sudo pcs node unstandby hopper-ufm-01
sudo ufm_ha_cluster takeover
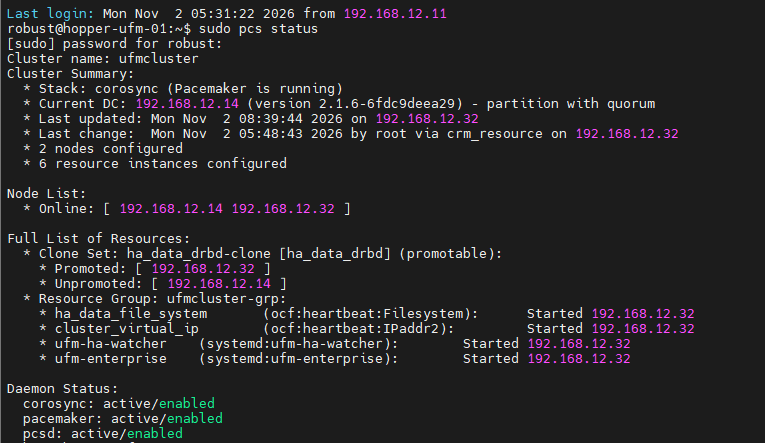
After rollback pcs status lists the nodes by IP address, because the standby command was given an IP.
3. Test 2: service failure
This checks whether the cluster notices when the UFM application itself dies, independently of the server’s operating system.
Command, on the current master:
sudo docker ps                      # find the UFM container ID
sudo docker kill <container_id>
What to verify:
- Pacemaker detects the service is down. It may first try to restart the container locally.
- If that fails repeatedly, it migrates the whole resource group (disk, IP and service) to the standby node.
Result:
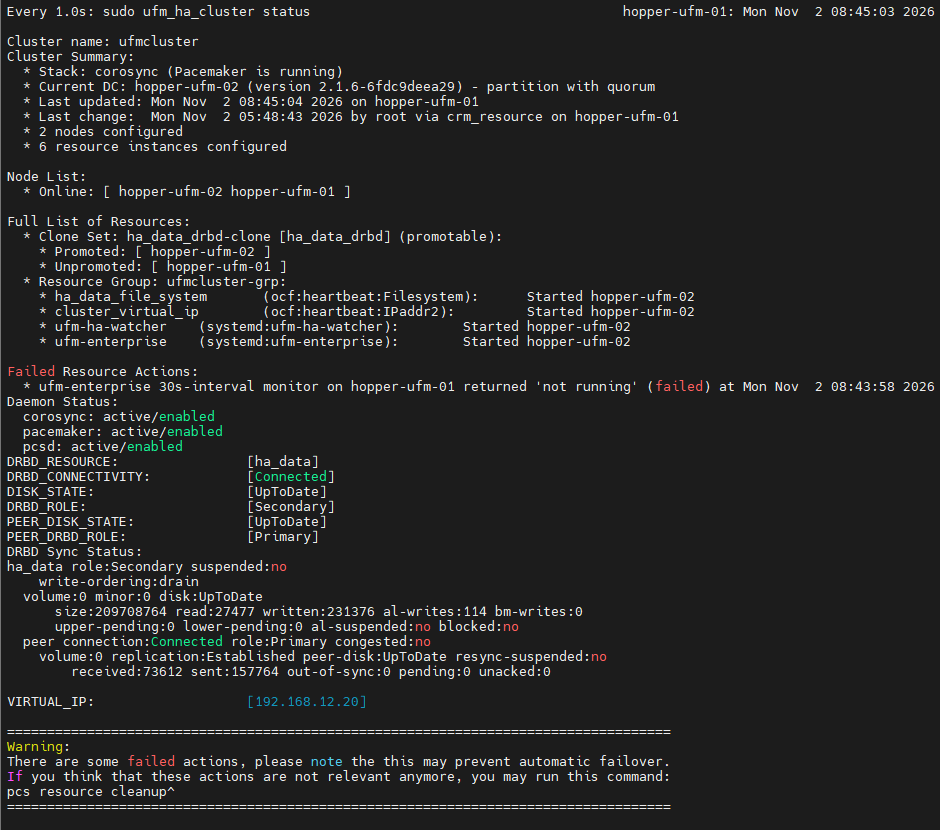
The status output records the failure — ufm-enterprise 30s-interval monitor … returned 'not running' (failed) — and the resource group is running on hopper-ufm-02.
Note the warning at the bottom of the status output: failed actions may prevent automatic failover until they are cleared. Clear them before running the next test:
sudo pcs resource cleanup
4. Test 3: the hard failover (STONITH)
The safest method. Rather than crash the whole operating system with a kernel panic, simulate a network partition (split-brain) by blocking the Corosync heartbeat. That makes the standby node assume the active node is dead and invoke STONITH.
Command, on the current master (hopper-ufm-01), dropping the Corosync heartbeat packets:
sudo iptables -A INPUT  -p udp -m multiport --dports 5404,5405 -j DROP
sudo iptables -A OUTPUT -p udp -m multiport --dports 5404,5405 -j DROP
Start from a known state: hopper-ufm-01 should be the active master and the cluster clean. After Test 2 that means clearing failed actions (sudo pcs resource cleanup) and failing back (sudo ufm_ha_cluster takeover, as in Test 1’s rollback).
What should happen next:
- Node 02 stops receiving heartbeats from node 01.
- After the timeout, node 02 declares node 01 dead.
- Node 01 is fenced and rebooted.
- Node 02 promotes DRBD to Primary, brings up the VIP and starts UFM.
Result:
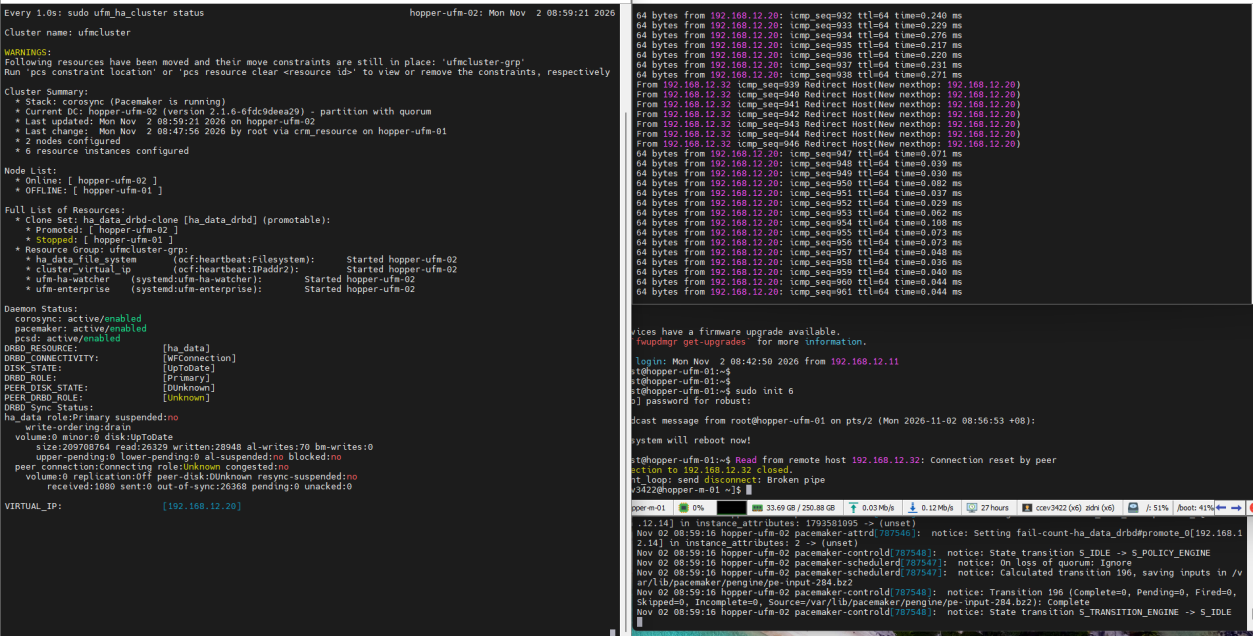
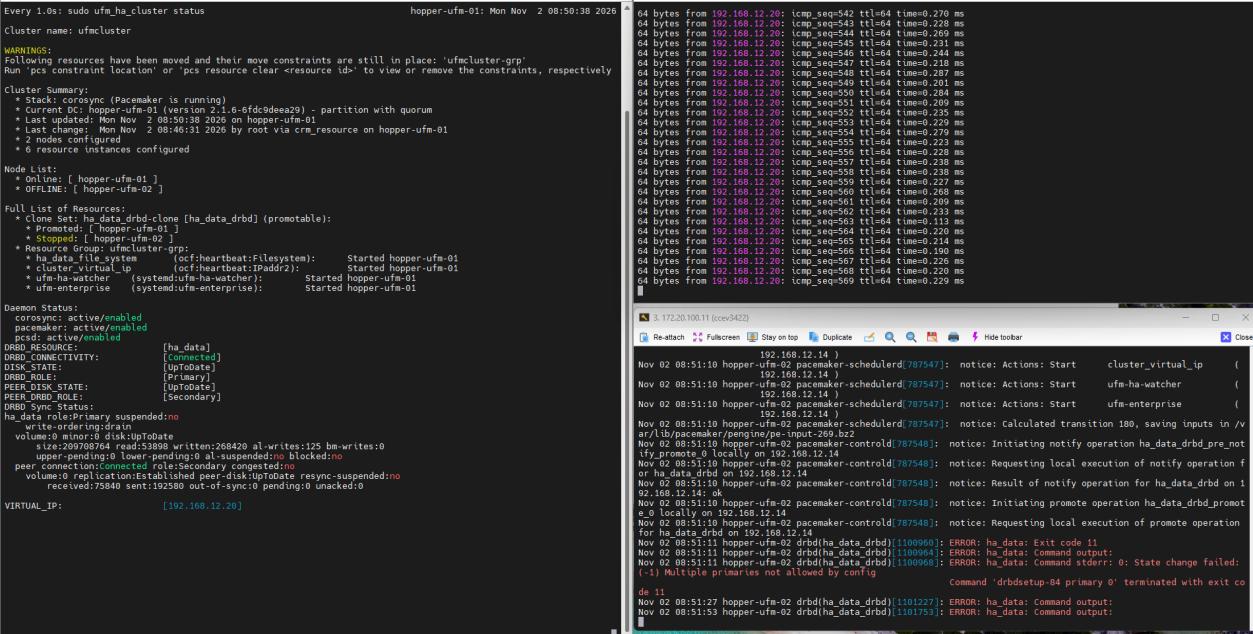
Left pane: node 02 now runs the resource group, node 01 is OFFLINE, and DRBD shows WFConnection with an Unknown peer. The right-hand panes show the VIP ping with redirect lines, and node 01’s terminal being disconnected as it reboots.
What the captures show, honestly
Reading these two captures closely, a few details are worth recording:
- In the first capture, node 02’s Pacemaker log tries to promote DRBD and logs
Multiple primaries not allowed by config. That is DRBD refusing a second Primary while node 01 still holds the role. This is the protection you want, and it also shows why fencing has to complete before promotion can succeed. - In the second capture, node 01’s terminal shows a reboot issued with
sudo init 6(“The system will reboot now!”), after which node 02 holds the resources. - The
pcs stonith historyoutput in section 5 contains earlier fencing events (April and June), not one dated to this run.
Taken together, I wouldn’t call fencing itself validated by this run. When I repeat it, I’ll confirm that a fencing event for the test appears in pcs stonith history and in the Pacemaker log.
Rollback after node 01 comes back. When node 01 boots, its iptables rules are reset (unless you saved them permanently). Make sure it rejoins as a standby:
sudo ufm_ha_cluster status
If there are cluster errors, clear them:
sudo pcs resource cleanup
5. Post-activity checks
1. DRBD should be synchronising. Expect UpToDate/UpToDate:
sudo drbdadm status

2. Check the STONITH history to confirm fencing was logged:
sudo pcs stonith history

The three events shown here are dated April and June, i.e. earlier fencing, not this run.
What I’d tighten next time
- Reset between tests. Failed actions left over from Test 2 can stop automatic failover in Test 3. Clear them and return to a known master first.
- Prove fencing, don’t assume it. Look for the fence event in both the Pacemaker log and
pcs stonith history, with a timestamp inside the test window. - Use node names consistently in
pcscommands. Mixing the IP address (standby 192.168.12.32) and the hostname (unstandby hopper-ufm-01) works, but it makespcs statusoutput harder to read. - Save the
iptablescleanup as a step, not a hope: the rules reset on reboot, but a node that doesn’t reboot keeps dropping heartbeats. - Time the outage. The plan records a 60-second failover; capture start and end timestamps from the ping and the Pacemaker log so the figure is evidence rather than an estimate.
Leave a Comment / Ask a Question
Have thoughts or questions on this article? Drop a message below and Faiez will receive an instant notification.